Friday, March 2, 2012

Documentation on WSO2 ESB's Connection Debug Object's logs

This is a documentation I created upon a Client's request. Should thank Hiranya for helping me out on this.

A connection debug object would be accumulated during request processing, but make use only if the connection encounters issues during processing.

Abbreviations

C2E: Client to ESB
E2C: ESB to Client
E2S: ESB to back-end Server
S2E: back-end Server to ESB


Log
Meaning
C2E-Req-ConnCreateTime
Time that the client created a connection with ESB.
C2E-Req-StartTime
Time that the ESB started processing the client request.
C2E-Req-EndTime
Time that the ESB finished processing the client request.
C2E-Req-URL
This is the request URI obtained from the request line of a request from client to ESB. The Request-URI is a Uniform Resource Identifier and identifies the resource upon which to apply the request. [1]
C2E-Req-Protocol
This is the protocol version obtained from the request line of a request from client to ESB.
C2E-Req-Method
This is the method token obtained from the request line of a request from client to ESB. (eg: GET, POST etc. [1])
C2E-Req-IP
Remote Client IP address where the request came from.
C2E-Req-Info
HTTP header of the request from client to ESB.
E2C-Resp-Start
Upon the request from client, ESB sends out a response back to the client. This is the time that the ESB started to send the response.
E2C-Resp-End
This is the time that the ESB completed sending the response.
E2S-Req-Start
Start time of the last request sent from ESB to a back-end server.
E2S-Req-End
Completion time of the request sent from ESB to a back-end server.
E2S-Req-ConnCreateTime
Time that the ESB created a connection with a back-end server.
E2S-Req-URL
URI of the back-end service (EndpointReference) that the last request is headed to.
E2S-Req-Protocol
This is the protocol version obtained from the request line of the last request from ESB to back-end server.
E2S-Req-Method
This is the method token obtained from the request line of the last request from ESB to back-end server. (eg: GET, POST etc. )
E2S-Previous-Attempts
This provides details on the previous request sent by ESB to the back-end server.
S2E-Resp-Start
Time that the ESB receives a response from a back-end server.
S2E-Resp-End
Time that the ESB complete processing a response from a back-end server.
S2E-Resp-Status
This is the status line of the response received by the ESB. The first line of a Response message is the Status-Line, consisting of the protocol version followed by a numeric status code and its associated textual phrase, with each element separated by SP characters.
S2E-Resp-Info
HTTP header of the response from the back-end server to ESB.
Total-Time
(E2C-Resp-End) - (C2E-Req-StartTime)
Svc-Time
(S2E-Resp-End) - (E2S-Req-Start)
ESB-Time
(Total-Time) - (Svc-Time)

  • You can find conversion patterns of logs etc. in “log4j.properties” file located at “{$ESB_HOME}/lib” folder.
  • You can find log files inside “{$ESB_HOME}/repository/logs” folder.
  • You can see HTTP headers and messages if you add “log4j.logger.org.apache.synapse.transport.nhttp.wire=DEBUG” line into your “log4j.properties” file.
  • You can set the log level of org.apache.synapse to DEBUG, to enable debugging for mediation.
  • Please see [2] for various log4j conversion patterns.

References


Wednesday, February 29, 2012

Filtering Related Re-directions of WSO2 Stratos

I've created a HTML5 presentation recently on filtering related re-directions of WSO2 Stratos. If you are interested you can see it here. (Chromium web browser is preferred.)

All these filters are JSP filters, which capture a certain URL pattern and direct it to another URL. You can learn more about JSP filters from here.

Sunday, January 29, 2012

Desktop Capturing Software for Ubuntu

I had a terrible time finding a good desktop capturing software for Ubuntu, so thought to write a post since I don't want you to get into the same trouble. I first tried "RecordMyDesktop", it is all good other than the format it outputs! As far as I could see, it only output in ".ogv" format. But I wanted to have it in AVI/mpeg format. Then I tried to find a converter. Downloaded some converters, but converted videos were in really bad quality.

This made me to search bit more. Then I found "XVidCap" software, which saved my day! It worked really well, and I recommend you to use it! You can easily search for it in Ubuntu Software Center and install!

Monday, September 19, 2011

A new design to Frame2Relex Component of OpenCog

Input

Set of frames.

Onetime steps (should be done beforehand and serialize)
Step 1

Extract all unique frame templates from mapping rules (RelEx2Frame) file.

Eg: ^1_Arriving:Manner($Arriving,$var0)

Step 2 – Frame-Rule Bitmap

Create a bitmap for each frame template (of step 1 list) whose length is the number of rules (RelEx2Frame), where each bit corresponds to a unique rule i.e. if the ith frame template is present in the jth rule, the jth bit of the ith bitmap is set to 1.

Step 3 – Rule-Frame Bitmap

Create a bitmap for each rule (RelEx2Frame) whose length is the number of frame templates, where each bit corresponds to a unique frame template i.e. if the ith frame template is present in the jth rule, the ith bit of the jth bitmap is set to 1.

Step 4

Serialize all bitmaps.

Algorithm

Step 1

De-serialize all bitmaps.

Step 2

For each frame in the input: (eg: ^1_Entity:Entity(John,John) )

    Find the matching frame templates. (i.e. ^1_Entity:Entity($var0,$var0) )
  
Step 3

Perform 'OR' operation on Frame-Rule bitmaps of matching frame templates to obtain the Frame-Rule bitmap which corresponds to the possible rules that the input frames represent. Thus, we obtain a subset of rules using the positions that are true.

Step 4

All the rules obtained from step 3 are not necessarily the rules that are valid, since in some rules there are multiple frames as consequent. Thus, we perform a check on the subset of rules obtained from step 3, using the Rule-Frame bitmaps.

For each rule in the subset of rules:
    We check whether all its consequent frame templates are present in the frame templates correspond to input frames.

From this step we obtain a subset of rules (i.e. all necessary rules) of rules obtained at step 3.

Step 5

For each necessary rule:
    Using corresponding actual frames we map variables (eg: $var0, $Time) of this rule.
    We take its conditional part and remove all the 'NOT' true relations and 'OR' relations (ideally we should not remove 'OR' conditions, but handling this is tough/impossible?). Thus we take only the standalone 'TRUE' relations and 'TRUE' relations joined with an 'AND'. Note these are relation templates (eg: _subj($var0,$var1) ).
    We substitute values of variables in relation templates and obtain the actual relex relations.


That's it! :) Of course this will not provide all the relex relations that are needed to form a sentence, due to the limitations in existing RelEx2Frame rules.

Test case:

Input:

^1_Entity:Entity(John,John)

^1_Being_named:Entity(John)

^1_Transitive_action:Agent(throw,John)

^1_Cause_motion:Agent(throw,John)

^1_Cause_motion:Theme(throw,ball)

^1_Transitive_action:Patient(throw,ball)


Output:


noun(John)

_subj(throw,John)

_obj(throw,ball)

person(John)

Sunday, August 7, 2011

Setting up a Huawei 3G Modem in Ubuntu 10.04

After a loooong time, got a chance to write a post (since it's short).

I was planning to buy a HSDPA dongle for a quite a some time now, but didn't feel it is that necessary since I have an ADSL connection at my home and there's WIFI and LAN connections at University. But a recent incident made me to buy one and I bought a Huawei E171 dongle.

When I try it on my Ubuntu 10.04 it showed nothing but the software (mostly exe files) inside the USB. Then I tried creating a new connection under 'Mobile Broadband' and try to connect, still it failed to connect. :( (totally frustrated)

Then I Googled a bit and found out that I need to install "usb-modeswitch" package, due to a known bug.

So I ran, "sudo apt-get install usb-modeswitch", and I saw that it installs an additional package called "usb-modeswitch-data".

After reconnecting my dongle and connecting to the connection I created under 'mobile broadband', I was able to connect to the Internet successfully!

Just thought to share, in case some of you get into the same trouble in future! :-)

See you all with another post!

Saturday, April 9, 2011

Apache Tuscany - Develop a simple tool that can be used to generate composite diagrams


Abstract: 
Apache Tuscany provides a comprehensive infrastructure to simplify the task of developing and managing Service Oriented Architecture (SOA) solutions based on Service Component Architecture (SCA) standard. Tuscany Java SCA is a lightweight runtime that is designed to run standalone or provisioned to different host environments.
Task is to implement a tool which generates composite diagrams from the composite files to illustrate the SCA artifacts and their wirings. SCA artifacts are composite, component, service, reference.
This tool can serve multiple purposes:
1) Help to document Tuscany's tutorials and samples.
2) Integrate with the SCA domain manager to visualize the SCA domain (contributions, composites, nodes etc).
Implementation Plan:
Composite XML should be generated using the Tuscany's in-memory representation of the composite model. It will then give as an input for the Composite Analyser. Composite Analyser is not a single object but the whole program itself as a single unit. Composite Analyser then analyses the XML document and grab the relevant DOM Elements such as CompositeComponentServiceReferencePropertyWire, Text etc. and starts to build the SVG document using SVG DOM API of Apache Batik.
Basically Composite Analyser contains three objects, CompositeFileReader, LayoutBuilder, and SVGDocumentBuilder.
  • CompositeFileReader is responsible for reading the input composite XML file and provide the necessary details to LayoutBuilder.
  • LayoutBuilder then builds a layout which uses the space optimally and provides the details of positions and sizes of each artifact to SVGDocumentBuilder. I already researched on few layout building algorithms and tools (JGraphX) but further research will be done and will pick the most appropriate algorithm.
  • SVGDocumentBuilder creates the DOM Elements according to the layout and builds the final SVG composite diagram.
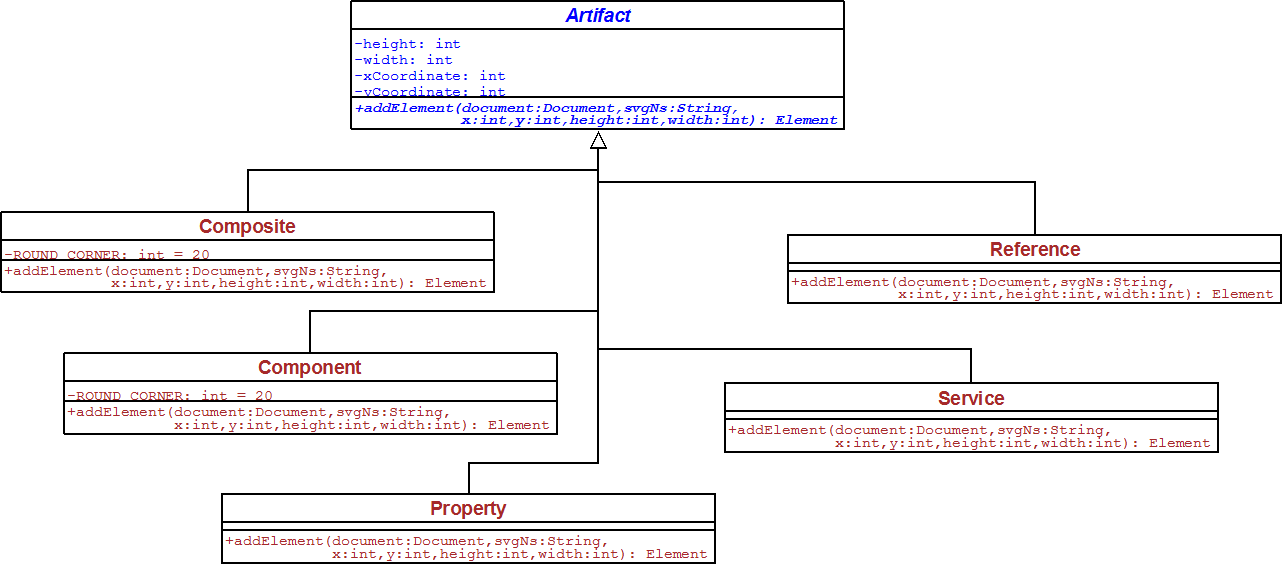
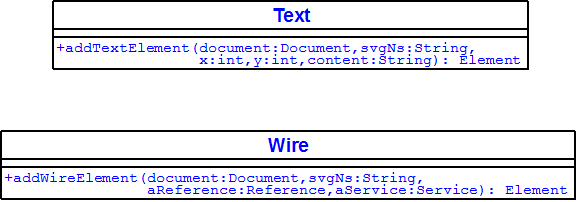
Since DOM elements (Composite, Component, Service, Reference, Property, Wire, Text etc.) will be used multiple times in order to build a single diagram, I am planning to create separate objects for those elements. Each object is responsible for creating its own element according to the requirement and giving it to the SVGDocumentBuilder. Most of the artifacts will hold a same structure and behaviour, therefore I have implemented following class diagram for the prototype.
In the prototype I built to create a SVG diagram using Apache Batik I used following SVG elements for each artifact mentioned above.
  • Composite, Component: “rect” SVG elements with rounded corners
  • Property: “rect” SVG element with equal height and width
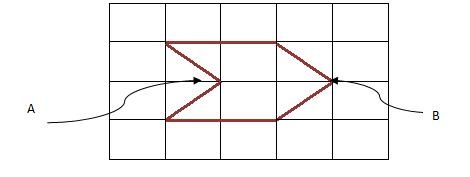
  • Reference: “polygon” SVG element with 6 vertices and coordination of point B of the following sketch should be given to the addElement method.
  • Service: “polygon” SVG element with 6 vertices and coordination of point A of the following sketch should be given to the addElement method.
  • Wire: “polyline” SVG element used to connect a Reference and a Service object.
  • Text: “text” SVG element used to add a given text 
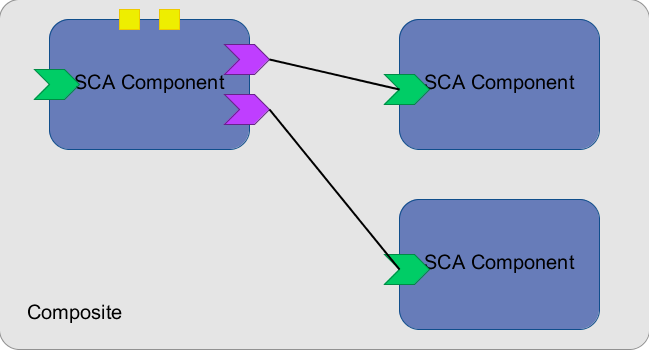
Following image shows a sample composite diagram which is built using Apache Batik as a prototype for this project after converting to PNG format. 
Deliverables:
  1. Code of the tool which will be built.
  2. Tests to verify the accuracy of the diagrams generated.
  3. User documentation on operation of the tool and sample diagrams generated. 
Time-line:
Till May 10
  • Read on Tuscany SCA Java, understand the design, and concentrate on project relevant parts
  • Read on Scalable Vector Graphics (SVG) 1.1
  • Read on Apache Batik and write examples to get familiar
  • Recognize all the artifacts of SCA.
  • Research on layout building algorithms and tools and find out the appropriate algorithm 
May 11 - May 24
  • Finalize the process view after getting the comments from the developers’ community and from my mentor.
  • Start initial implementations - building artifact structures 
May 24 - July 10
  • Preparing for the mid-term evaluation of the project.  
July 12 - August 15
  • Implement Composite Analyzer
  • Improve performance by using parallel design patterns.
  • Develop test cases to verify the accuracy of the generated diagrams. 
August 16 - August 22
  • Wrap up the work done, and polishing up the code.
  • Preparing for the final evaluation. 
August 26
  • Final evaluation deadline.
Community Interactions:
Apache Tuscany developers’ community is the main community behind this project and I highly appreciate comments/ ideas of the expert developers of Tuscany and consider those as a great opportunity to learn and contribute more and more to the improvement of Tuscany.
Biography:
I am Nirmal Fernando, final year undergraduate at Department of Computer Science and Engineering at University of Moratuwa, Sri Lanka. I am very competent at Java programming language, OOP, XML, XSL and data structures and algorithms. I am familiar with SOA concepts and web services.
I participated in GSoC 2010 for Apache Derby (RDBMS in Java) project and successfully finished the project. This is a sample of the work (final output) which I've done for Derby last summer (http://nirmalfdo.blogspot.com/p/my-work-at-gsoc-2010.html).
You can find my profile and recommendations at LinkedIn (http://www.linkedin.com/profile/view?id=54105394&trk=tab_pro).
I am looking forward to have an exciting summer with Apache Tuscany, and I consider this is a great opportunity to me, to apply my knowledge and skills into a real world application which benefits many people around the globe. 
Thanks!

Thursday, January 27, 2011

Using Java Executor Framework...

Java Executor Framework provides a solution using a thread pool to the following problems of using threads directly:

  • Creating a new thread causes some performance overhead.
  • Too many threads can lead to reduced performance, as the CPU needs to switch between these threads.
  • You cannot easily control the number of threads, therefore you may run into out of memory errors due to too many threads.
Here's a code snippet on how you can use it:

import java.util.concurrent.ExecutorService;
import java.util.concurrent.Executors;

public class TestExecutor {
   
    private static final int NTHREDS = 10;

    /**
     * @param args
     */
    public static void main(String[] args) {

        long l=System.currentTimeMillis();
        ExecutorService executor = Executors.newFixedThreadPool(NTHREDS);
        for (int i = 0; i < 10000; i++) {
            Runnable worker = new Test(i);
            executor.execute(worker);
        }
        // This will make the executor accept no new threads
        // and finish all existing threads in the queue
        executor.shutdown();
        // Wait until all threads are finish
        while (!executor.isTerminated()) {

        }
        System.out.println("Total time: "+ (System.currentTimeMillis()-l));
    }
public class Test implements Runnable {

    private int id;
   
    public Test(int id) {
        this.id = id;
    }

    @Override
    public void run() {
        int sum=id;
        for(int j=0; j<10000000;j++)
            sum += j;
        System.out.println("My sum = "+sum);
    }
}

You may note that I have used a thread pool with ten threads, you can change the size of the pool according to your need.

You may wonder what actually applying concurrency does to your application's performance. Here's a comparison of CPU usage without and with using threads.


My application without using threads!

Application is running in the time gap

of 40 - 0 seconds in the CPU history

graph. You may note that CPU

utilization is 30% & 100%. i.e. not

effectively utilized.


My application using threads!

Application is running in the time gap

of 25 - 0 seconds in the CPU history

graph. You may note that CPU

utilization is 100% & 100%. Thus the

both CPUs are effectively utilized.


There is another way that you can get the advantage of Java Executor Framework, I will elaborate on that in my next post! :)

Happy Threading!! :D